PIC and EEPROM Programmer
+3
ultrasonic™
james
PIC
7 posters
AELEXIAN EMPIRE :: ELECTRONIC CATEGORY :: Microcontroller/Microprocessor Unit Projects and Programming
Page 1 of 1
 PIC and EEPROM Programmer
Project Summary
In this project we are building a JDM programmer that can handle PIC12, PIC16 and PIC18 family microcontrollers and some popular 24C family EEPROMs.

Project Description
The programmer also provides ICSP feature that allows In-Circuit Serial Programming. So if you desire, you will not have to carry your MCU each time when you reprogram it. The circuit is connected to the PC via serial port and no external power supply is needed. On the other hand, if you want to use it with a laptop that do not provide RS232 connection, using the circuit with a USB to RS232 converter may not give a proper result.
EEPROM:
24C01A, 24C02,24C04,24C08, 24C16, 24C32, 24C64/65, AT24C128, AT24C256, AT24C512, M24C128, M24C256, 24C515, PCF8572 or 8572 = 24C01, PCF8582 or 8582 = 24C02, PCF8592 or 8592 = 24C04, SDA2506, SDA2526, SDA2546, SDA2586, SDA3506, SDA3516, SDA3526, 4C016 == 24C01, GRS-003 == 24C02, GRN-004 == 24C04, GRN-008 == 24C04, GRX-006 == 24C04, GRX-007 == 24C04, KKZ06F == 24C01, BAW658049 == 24C02, BAW57452 == 24C02, M8571 == 24C02, X24C0
Microchip PIC:
12C508, 12C508A, 12C509, 12C509A, 12CE518, 12CE519, 12C671, 12C672, 12CE673, 12CE674, 12F629, 12F675, 16C433, 16C61, 16C62A, 16C62B, 16C63, 16C63A, 16C64A, 16C65A, 16C65B, 16C66, 16C67, 16C71, 16C72, 16C72A, 16C73A, 16C73B, 16C74A, 16C74B, 16C76, 16C77, 16F73, 16F74, 16F76, 16F77, 16C84, 16F83, 16F84, 16F84A, 16C505, 16C620, 16C620A, 16C621, 16C621A, 16C622, 16C622A, 16CE623, 16CE624, 16CE625, 16F627, 16F628, 16F628A, 16F630, 16F676, 16C710, 16C711, 16C712, 16C715, 16C716, 16C717, 16C745, 16C765, 16C765, 16C770, 16C771, 16C773, 16C774, 16C781, 16C782, 16F690, 16F818, 16F819, 16F870, 16F871, 16F872, 16F873, 16F874, 16F876, 16F877, 16F873A, 16F874A, 16F876A, 16F877A18F242, 18F248, 18F252, 18F258, 18F442, 18F448, 18F452, 18F458, 18F1320, 18F2330, 18F432
As you see the circuitry contains a few components listed below.
T1, T2 : BC337 Transistor
D1, D4, D5, D6 : 1N4148 Diode
D3 : 6V2 Zener Diode
D2 : 5V1 Zener Diode
R3, R4 : 1K8 1/4W Resistor
R1 : 10K 1/4W Resistor
R2 : 1K5 1/4W Resistor
X1 : DB9 PCB Mount Female Connector
C1, C2 : 100uF 16V Electrolytic Capacitor
SV1 and SV4 : 40 Pin Machine Tooled IC Socket
SV2, SV3 : 20 Pin Machine Tooled IC Socket
SV5 (ICSP) : 6 Pin Header Connector9
L1, L2, L3 : LED (L1: GREEN, L2: RED, L3: YELLOW)

The PCB file is provided in pdf format. You can apply it to the board by using the ironing method.

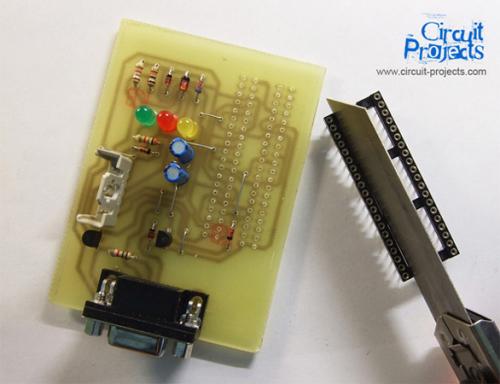
Assembling the components is straightforward. The only trick is shown in the photo. Before soldering the 40 pin socket, you must cut the plastic bridges between the sides. Another issue, don’t forget to solder the diode (D6) and the jumper under the sockets first.

Here is the final. If you don’t miss any short-circuits, you will see the red LED will bright up when you connect the programmer to the serial port. Now it is ready to use. You may use ICPROG and WinPIC to start programming your PICs or EEPROMs.
LED Indications; Yellow:Clock , Red:Power , Green:Program

Placement is shown in the figure below.
Don’t forget! Wrong placement may defect your IC, programmer or computer.
You may use a ZIF socket instead according to your needs.

PDF download
source: www.circuit-projects.com
In this project we are building a JDM programmer that can handle PIC12, PIC16 and PIC18 family microcontrollers and some popular 24C family EEPROMs.

Project Description
The programmer also provides ICSP feature that allows In-Circuit Serial Programming. So if you desire, you will not have to carry your MCU each time when you reprogram it. The circuit is connected to the PC via serial port and no external power supply is needed. On the other hand, if you want to use it with a laptop that do not provide RS232 connection, using the circuit with a USB to RS232 converter may not give a proper result.
EEPROM:
24C01A, 24C02,24C04,24C08, 24C16, 24C32, 24C64/65, AT24C128, AT24C256, AT24C512, M24C128, M24C256, 24C515, PCF8572 or 8572 = 24C01, PCF8582 or 8582 = 24C02, PCF8592 or 8592 = 24C04, SDA2506, SDA2526, SDA2546, SDA2586, SDA3506, SDA3516, SDA3526, 4C016 == 24C01, GRS-003 == 24C02, GRN-004 == 24C04, GRN-008 == 24C04, GRX-006 == 24C04, GRX-007 == 24C04, KKZ06F == 24C01, BAW658049 == 24C02, BAW57452 == 24C02, M8571 == 24C02, X24C0
Microchip PIC:
12C508, 12C508A, 12C509, 12C509A, 12CE518, 12CE519, 12C671, 12C672, 12CE673, 12CE674, 12F629, 12F675, 16C433, 16C61, 16C62A, 16C62B, 16C63, 16C63A, 16C64A, 16C65A, 16C65B, 16C66, 16C67, 16C71, 16C72, 16C72A, 16C73A, 16C73B, 16C74A, 16C74B, 16C76, 16C77, 16F73, 16F74, 16F76, 16F77, 16C84, 16F83, 16F84, 16F84A, 16C505, 16C620, 16C620A, 16C621, 16C621A, 16C622, 16C622A, 16CE623, 16CE624, 16CE625, 16F627, 16F628, 16F628A, 16F630, 16F676, 16C710, 16C711, 16C712, 16C715, 16C716, 16C717, 16C745, 16C765, 16C765, 16C770, 16C771, 16C773, 16C774, 16C781, 16C782, 16F690, 16F818, 16F819, 16F870, 16F871, 16F872, 16F873, 16F874, 16F876, 16F877, 16F873A, 16F874A, 16F876A, 16F877A18F242, 18F248, 18F252, 18F258, 18F442, 18F448, 18F452, 18F458, 18F1320, 18F2330, 18F432
As you see the circuitry contains a few components listed below.
T1, T2 : BC337 Transistor
D1, D4, D5, D6 : 1N4148 Diode
D3 : 6V2 Zener Diode
D2 : 5V1 Zener Diode
R3, R4 : 1K8 1/4W Resistor
R1 : 10K 1/4W Resistor
R2 : 1K5 1/4W Resistor
X1 : DB9 PCB Mount Female Connector
C1, C2 : 100uF 16V Electrolytic Capacitor
SV1 and SV4 : 40 Pin Machine Tooled IC Socket
SV2, SV3 : 20 Pin Machine Tooled IC Socket
SV5 (ICSP) : 6 Pin Header Connector9
L1, L2, L3 : LED (L1: GREEN, L2: RED, L3: YELLOW)

The PCB file is provided in pdf format. You can apply it to the board by using the ironing method.

Assembling the components is straightforward. The only trick is shown in the photo. Before soldering the 40 pin socket, you must cut the plastic bridges between the sides. Another issue, don’t forget to solder the diode (D6) and the jumper under the sockets first.

Here is the final. If you don’t miss any short-circuits, you will see the red LED will bright up when you connect the programmer to the serial port. Now it is ready to use. You may use ICPROG and WinPIC to start programming your PICs or EEPROMs.
LED Indications; Yellow:Clock , Red:Power , Green:Program

Placement is shown in the figure below.
Don’t forget! Wrong placement may defect your IC, programmer or computer.
You may use a ZIF socket instead according to your needs.

PDF download
source: www.circuit-projects.com

PIC- AA Battery

- Posts : 85
Join date : 2010-12-17
Age : 34
Location : Bohol
 Re: PIC and EEPROM Programmer
Parang ito yung ginawa ko. :face:

james- 24V BATTERY

- Posts : 1081
Join date : 2011-11-14
 Re: PIC and EEPROM Programmer
iyan nga gnawa natin sis js (^_^
btw pwde kaya epost etong GUI nya dito? (^_^
winpicpgm1650
@sis pek tnx for posting
btw pwde kaya epost etong GUI nya dito? (^_^
winpicpgm1650
@sis pek tnx for posting

ultrasonic™- 24V BATTERY

- Posts : 4476
Join date : 2010-08-19
Age : 38
Location : Davao City
 Re: PIC and EEPROM Programmer
mga sir maliit ang pcb layout niyo sa actual sizing ng mga parts. tiyak magkakaproblema ang gagawa
ito po ang akin
PIC and EEPROM Programmer
ito po ang akin
PIC and EEPROM Programmer

Digitap- Admin

- Posts : 927
Join date : 2010-09-03
Age : 33
Location : Makati City
 Re: PIC and EEPROM Programmer
^ oie nows ko lng npnsin ang post mu princess... tnx +1

ultrasonic™- 24V BATTERY

- Posts : 4476
Join date : 2010-08-19
Age : 38
Location : Davao City
 Re: PIC and EEPROM Programmer
Meron ba nyan yung pang usb na version?

james- 24V BATTERY

- Posts : 1081
Join date : 2011-11-14
 Re: PIC and EEPROM Programmer
sino naka gawa usb dito...abang nalang..

DJFEL- 24V BATTERY

- Posts : 1780
Join date : 2012-11-21
Age : 42
Location : SIUIJOR
 Re: PIC and EEPROM Programmer
DJFEL wrote:sino naka gawa usb dito...abang nalang..
try the Open Programmer v0.8.x
https://aelexian.forumotion.com/t706-open-programmer-v-08x-usb-version-for-eeproms

PIEZO- Admin

- Posts : 143
Join date : 2010-08-12
Age : 42
 Re: PIC and EEPROM Programmer
paki shear nang diagram neto..parang wla diagram...

DJFEL- 24V BATTERY

- Posts : 1780
Join date : 2012-11-21
Age : 42
Location : SIUIJOR

Hertz- Admin

- Posts : 1822
Join date : 2010-08-12
Age : 44
Location : Cagayan De Oro City
 Re: PIC and EEPROM Programmer
tnks neto herts...

DJFEL- 24V BATTERY

- Posts : 1780
Join date : 2012-11-21
Age : 42
Location : SIUIJOR
 Re: PIC and EEPROM Programmer
walay sapayan

Hertz- Admin

- Posts : 1822
Join date : 2010-08-12
Age : 44
Location : Cagayan De Oro City
 Re: PIC and EEPROM Programmer

sino kaya naka gawa lahat neto..

DJFEL- 24V BATTERY

- Posts : 1780
Join date : 2012-11-21
Age : 42
Location : SIUIJOR
AELEXIAN EMPIRE :: ELECTRONIC CATEGORY :: Microcontroller/Microprocessor Unit Projects and Programming
Page 1 of 1
Permissions in this forum:
You cannot reply to topics in this forum


