
EEPROM DATA Copier (standalone) using PIC16F84
AELEXIAN EMPIRE :: ELECTRONIC CATEGORY :: Microcontroller/Microprocessor Unit Projects and Programming
Page 1 of 2 • 1, 2 ![]()
![]()
 EEPROM DATA Copier (standalone) using PIC16F84
![]() by Hertz Sat Apr 25, 2015 1:34 pm
by Hertz Sat Apr 25, 2015 1:34 pm
Standalone copier I2C memories to 24CXX

Description:


Pattern analysis:

PCB:
https://2img.net/h/i1094.photobucket.com/albums/i453/aelexianempire/hertz/cop-cibg_zpsvmnpag1j.gif
Realization of the PCB:
List of components:
3 resistors 330 ohms.
9 resistors 10k ohms.
1 resistance 22 k ohms.
2 capacitors 15 pF (ceramic).
1 2.2 uF capacitor (tantalum).
1 10 uF capacitor (electrolytic, radial).
1 1N4001 diode.
2 supports 'tulip' 8-pin (2 x 4).
1 support 'tulip' 18-pin (2 x 9).
1 4 MHz quartz.
1 PIC 16F84 (or 16F84A or 16C84).
1 7805.
6 keys (see description).
1 red LED, 5 mm diameter.
1 green LED, 5 mm diameter.
1 yellow LED, 5 mm diameter.
1 double screw terminal
1 triple screw terminal
1 clip for 9V battery.
1 9V battery.
Various: welding, epoxy, perchloric, switches, etc.
Optional:
- 2 inters rocking (battery and manual)
- A push button (external RESET).
remarks:
Mandatory use media 'tulip', especially for I2C memories, for they shall be called upon to support many withdrawals and insertions.
A word about the keys: this model button (square, 6 mm square) is quite common, it is found in mice computer, front VCRs, CD players and other audio or video devices of all kinds :
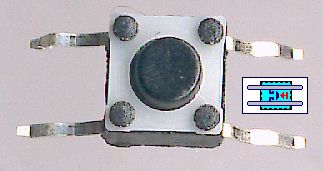


As shown in scheme and photos above, the keys have four connections, but which are in fact connected in pairs internally: these are the ends of two parallel strips (bands contacted during pressing the key); in doubt, check the contact to the meter. This structure enables easy swaged keyboards without having to add strap to cross the lines and columns. You can choose a different model of key to the RESET button, or abstain from the wire if you prefer to use an external button (connected to three terminal).
 Component layout:
wiring:
Start with soldering the resistors and the jumper (consisting of a resistor leg) and the diode, and six buttons and three media ICs, capacitors 'ceramic', chemical, LEDs, quartz, and finally terminal blocks. Connect the 9v battery clip to the double block, possibly a serial switch.
If you do not use the external RESET button or the "Mode" switch (see Commissioning), it is not really necessary to weld the triple block.
Photo of the completed installation:


As you can see from the photo above, there is some space under the keys to paste labels indicating the type of memory which is associated each key; from left to right: 24C01, 24C02, 24C04, 24C08 and 24C16. RESET (white, next to the controller) allows to recover waiting for a programming cycle.
Programming the PIC:
Personally, I use the JDM programmer; its structure is simple, and it draws power directly from the serial port to which it is connected.
Here is the web page that describes the realization of the JDM programmer:
http://www.jdm.homepage.dk/newpic1.htm.
A little cold with Internet Shakespeare's language find there a page with its description in French:
http://perso.club-internet.fr/f5jtz/pjacquet/pip02.htm.
Rather than the proposed PIP02 program, I urge you to use another DOS program PicCheap, which seems to turn better in the current fast PC:
http://www.piccheap.fr.st.
Windows enthusiasts can also try IcProg:
http://www.h2deetoo.demon.nl/index1.htm.
For my part, I stayed at PicCheap.
The program:
MPASM.EXE: assembler kindly provided by Microchip.
P16F84.INC: the included file containing definitions of PIC16F84 registers.
ASM.BAT: the file to launch, calling the assembler with the right options.
When you launch the file ASM.BAT, assembly occurs and generates four new files:
COP10.COD, which is of no interest to us.
COP10.ERR: the list of errors encountered in the compilation; it is empty (0 byte) if all went well.
COP10.HEX: The file in Intel format / Hex codes containing 'machine' to load into the PIC through PicCheap.
COP10.LST: the listing containing all information obtained in the compilation (source program codes 'machine', messages and number of errors, etc.).
Commissioning:
use:
The battery is connected, the memories have been inserted on the supports 8-pin (the original side of the triple block and the memory of the quartz blank side).
At power up, both red and green LEDs flash alternately, indicating that the installation is ready to make a copy.
Press the button for the type of these memories:
[24C01], [24C02], [24C04], [24C08] or [24C16]
The cycle is launched: the red and green LEDs are extinguished; the yellow LED will flash.
If everything goes normally, the yellow LED will flash:
1 both in the case of 24C01.
Two times in the case of 24C02.
4 times in the case of 24C04.
8 times in the case of 24C08.
16 times in the case of 24C16.
Then the program ends and the green LED lights to indicate that everything is over, and no errors were detected (yellow and red LEDs off).
If a problem occurs (No memory, write error ...), programming is interrupted immediately and the red LED lights (yellow and green LEDs off).
When everything is finished, the programming was successful or not, just press the RESET button (Reset) to return to fashion 'Waiting' (flashing red / green); then we can start another program by pressing one of the five buttons.
Pressing the programming current RESET button shortens the operation. The copy is then only partial, it will consequently raise the duplication.
The program lasts about:
1 second in the case of 24C01,
2 seconds in case of 24C02,
4 seconds in the case of 24C04,
8 seconds in the case of 24C08,
16 seconds in the case of 24C16.
This period may seem long, especially for those who use the programmer for PC (on serial or parallel port), the action is almost instantaneous, but the algorithm has been enhanced to detect so to say for sure (almost) any error; reliability is the price ...
The switch 'Mode', when passing avoids a verification phase and reduce the duration of the program by about a third (and for a 24C16, she spends about 11 seconds). But it is a shame to limit this way the reliability of the system, and I do not rule assigned to the switch another function, in a later version of the system.
source: col2000.free.fr

Hertz- Admin

- Posts : 1822
Join date : 2010-08-12
Age : 43
Location : Cagayan De Oro City
michaelverano17 likes this post
![]()
![]()
Re: EEPROM DATA Copier (standalone) using PIC16F84
![]() by danny Tue May 05, 2015 10:36 am
by danny Tue May 05, 2015 10:36 am

danny- D Battery

- Posts : 429
Join date : 2012-04-16
Location : Seattle, Washington -

![]()
![]()
Re: EEPROM DATA Copier (standalone) using PIC16F84
![]() by alvinquimbo Tue May 05, 2015 8:27 pm
by alvinquimbo Tue May 05, 2015 8:27 pm


alvinquimbo- 12V BATTERY

- Posts : 773
Join date : 2014-03-29
Age : 35
Location : Davao City
![]()
![]()
Re: EEPROM DATA Copier (standalone) using PIC16F84
![]() by alvinquimbo Tue May 05, 2015 8:30 pm
by alvinquimbo Tue May 05, 2015 8:30 pm

alvinquimbo- 12V BATTERY
- Posts : 773
Join date : 2014-03-29
Age : 35
Location : Davao City
![]()
![]()
Re: EEPROM DATA Copier (standalone) using PIC16F84
![]() by james Tue May 05, 2015 9:35 pm
by james Tue May 05, 2015 9:35 pm

james- 24V BATTERY

- Posts : 1081
Join date : 2011-11-14
![]()
![]()
Re: EEPROM DATA Copier (standalone) using PIC16F84
![]() by Hertz Tue May 05, 2015 10:27 pm
by Hertz Tue May 05, 2015 10:27 pm
merong parallel version at serial version
sa mga usb puede na ang pickit2 clone at open programmer v0.8
pinakamurang programmer na serial naman ang 7 strings PIC programmer ng taga elab. pili ka na lang dyan alvinquimbo kung anong pang load mo.
danny wrote:wow thanks for sharing
your welcome Sir
Hertz- Admin
- Posts : 1822
Join date : 2010-08-12
Age : 43
Location : Cagayan De Oro City
![]()
![]()
Re: EEPROM DATA Copier (standalone) using PIC16F84
![]() by Hertz Tue May 05, 2015 10:46 pm
by Hertz Tue May 05, 2015 10:46 pm
alvinquimbo wrote:salamat po nito sir hertz dagdag gamit po ito sa aking work bench..syanga pala sir hertz ano yang mode at saka RAZ..?di po kasi malinaw sa akin,yung reset ay naiintindihan ko at ang kanyang function..salamat na marami sir...Sir ikumusta nyo po kami kay sir ultra kung kumusta na sya..
optional button ang mga yan para sa mga nagmamadali. Mode is for avoid verification na tapos na ang programming. Raz naman for time lesse duration. tungkol kay Sir. hindi pa rin siya ok. He's suffered a lot. lets pray na lang for his fast recovery
Hertz- Admin
- Posts : 1822
Join date : 2010-08-12
Age : 43
Location : Cagayan De Oro City
![]()
![]()
Re: EEPROM DATA Copier (standalone) using PIC16F84
![]() by alvinquimbo Wed May 06, 2015 8:41 am
by alvinquimbo Wed May 06, 2015 8:41 am
on topic salamat sa reply sir..sige try ko itong programmer nato..update nyo po kami sir hertz tungkol kay sir ultra..
alvinquimbo- 12V BATTERY
- Posts : 773
Join date : 2014-03-29
Age : 35
Location : Davao City
![]()
![]()
james- 24V BATTERY
- Posts : 1081
Join date : 2011-11-14
![]()
![]()
Re: EEPROM DATA Copier (standalone) using PIC16F84
![]() by Electro Fri May 08, 2015 9:42 am
by Electro Fri May 08, 2015 9:42 am

Electro- 24V BATTERY
- Posts : 1488
Join date : 2010-08-26
Age : 35
Location : Calinan Davao City
![]()
![]()
Re: EEPROM DATA Copier (standalone) using PIC16F84
![]() by Electro Fri May 08, 2015 9:46 am
by Electro Fri May 08, 2015 9:46 am
Electro- 24V BATTERY
- Posts : 1488
Join date : 2010-08-26
Age : 35
Location : Calinan Davao City
![]()
![]()
Re: EEPROM DATA Copier (standalone) using PIC16F84
![]() by Hertz Tue May 12, 2015 10:13 am
by Hertz Tue May 12, 2015 10:13 am
Hertz- Admin
- Posts : 1822
Join date : 2010-08-12
Age : 43
Location : Cagayan De Oro City
![]()
![]()
Re: EEPROM DATA Copier (standalone) using PIC16F84
![]() by ultrasonic™ Sat Jul 11, 2015 12:38 pm
by ultrasonic™ Sat Jul 11, 2015 12:38 pm
+1.. gamit na gamit ko yan sa mga home servicing system.. lalot ang kaharap kng unit ay bago sakin at napa work ko ng tama.... binabackup/copy method ko agad kasi im thinking na darating din ang time na eeprom issues yan someday lalot naka matrix ang design...
xa nga pala.. pa ot saglit: maganda din ung atmel version nyan... pa share na rin nun Sir H ^_^

ultrasonic™- 24V BATTERY
- Posts : 4475
Join date : 2010-08-19
Age : 38
Location : Davao City
![]()
![]()
Re: EEPROM DATA Copier (standalone) using PIC16F84
![]() by Digitap Tue Jul 14, 2015 12:47 pm
by Digitap Tue Jul 14, 2015 12:47 pm

Digitap- Admin
- Posts : 927
Join date : 2010-09-03
Age : 33
Location : Makati City
![]()
![]()
Re: EEPROM DATA Copier (standalone) using PIC16F84
![]() by james Tue Jul 14, 2015 4:52 pm
by james Tue Jul 14, 2015 4:52 pm
james- 24V BATTERY
- Posts : 1081
Join date : 2011-11-14
![]()
![]()
Re: EEPROM DATA Copier (standalone) using PIC16F84
![]() by ultrasonic™ Wed Jul 15, 2015 5:13 pm
by ultrasonic™ Wed Jul 15, 2015 5:13 pm
na wash out ^_^
ultrasonic™- 24V BATTERY
- Posts : 4475
Join date : 2010-08-19
Age : 38
Location : Davao City
![]()
![]()
Re: EEPROM DATA Copier (standalone) using PIC16F84
![]() by PIC Wed Jul 22, 2015 11:55 am
by PIC Wed Jul 22, 2015 11:55 am

retrieve mo kaya Sir gamit ang EaseUS Data Recovery Wizard

PIC- AA Battery

- Posts : 85
Join date : 2010-12-17
Age : 33
Location : Bohol
![]()
![]()
Hertz- Admin
- Posts : 1822
Join date : 2010-08-12
Age : 43
Location : Cagayan De Oro City
![]()
![]()
Re: EEPROM DATA Copier (standalone) using PIC16F84
![]() by Digitap Fri Dec 18, 2015 3:10 pm
by Digitap Fri Dec 18, 2015 3:10 pm
ultrasonicwrote:eh kasi princess..nwala na ung akin
na wash out ^_^
bigay ko sayo ang files ko. sumama ka lang sa Party
Digitap- Admin
- Posts : 927
Join date : 2010-09-03
Age : 33
Location : Makati City
![]()
![]()
Re: EEPROM DATA Copier (standalone) using PIC16F84
![]() by Hertz Sat Dec 26, 2015 11:52 am
by Hertz Sat Dec 26, 2015 11:52 am

Hertz- Admin
- Posts : 1822
Join date : 2010-08-12
Age : 43
Location : Cagayan De Oro City
![]()
![]()
danny- D Battery
- Posts : 429
Join date : 2012-04-16
Location : Seattle, Washington -
![]()
![]()
Re: EEPROM DATA Copier (standalone) using PIC16F84
![]() by Digitap Sat Jan 02, 2016 10:59 am
by Digitap Sat Jan 02, 2016 10:59 am
Digitap- Admin
- Posts : 927
Join date : 2010-09-03
Age : 33
Location : Makati City
![]()
![]()
Re: EEPROM DATA Copier (standalone) using PIC16F84
![]() by danny Mon Jan 04, 2016 11:07 am
by danny Mon Jan 04, 2016 11:07 am
baka busy siya
christmas part nyo ba sa work?
danny- D Battery
- Posts : 429
Join date : 2012-04-16
Location : Seattle, Washington -
![]()
![]()
Re: EEPROM DATA Copier (standalone) using PIC16F84
![]() by ultrasonic™ Tue Jan 05, 2016 12:40 pm
by ultrasonic™ Tue Jan 05, 2016 12:40 pm
pero im thankful. binisita mo pa rin ako princess.. magandang pamasko at new year gift yun... salamat tlga...
yan palang offer mo send mo nlng sa inbox ko plz... hehehe ^_^
@sir danny.. yap sa work namin.. pero sa Tesda group side
ultrasonic™- 24V BATTERY
- Posts : 4475
Join date : 2010-08-19
Age : 38
Location : Davao City
![]()
![]()
Re: EEPROM DATA Copier (standalone) using PIC16F84
![]() by james Tue Jan 19, 2016 8:23 pm
by james Tue Jan 19, 2016 8:23 pm
james- 24V BATTERY
- Posts : 1081
Join date : 2011-11-14
![]()
![]()
Page 1 of 2 • 1, 2 ![]()
![]()
» eeprom data for sharp 14v-L80m
» Computer Monitor (EEPROM data)
» NOVA LED TV32 A7 TP.VST59.PB712 EEPROM DATA
» pin data ng LA76931k
AELEXIAN EMPIRE :: ELECTRONIC CATEGORY :: Microcontroller/Microprocessor Unit Projects and Programming
|
|
|